Project 1: Images of the Russian Empire— Colorizing the Prokudin-Gorskii Photo Collection
[View Assignment]Overview
The goal of this project is to take digitized Prokudin-Gorskii glass plate images and, using image processing techniques, automatically produce a color image with as few visual artifacts as possible. Each glass plate contains three grayscale exposures (Blue, Green, Red). The task is to extract these channels, align them correctly, and combine them into a single RGB image.
Approach
Using the provided skeleton Python code, I first imported the images, converted them to floats, and seperated each color channel (by thirds) before alignment. Then, I implemented two main alignment strategies: a naive exhaustive search for smaller images and a pyramid-based coarse-to-fine search for larger images, with additional preprocessing steps to improve alignment on difficult images (e.g., emir.tif's different color channels).
Naive Alignment
The naive approach exhaustively searches over a fixed displacement window ([-15, 15] pixels) and evaluates each shift using a similarity metric. I experimented with:
- L2 norm: Measures squared pixel differences. Works on simple cases but is sensitive to brightness differences. I used this metric initially for the smaller images.
- Normalized Cross-Correlation (NCC): Normalizes intensity. This produced better results on most images.
To improve accuracy, I cropped 20% of the image borders before scoring to avoid artifacts from dark borders and wrap-around introduced by shifting. This approach immediately worked for the smaller images (e.g., cathedral.jpg, monastery.jpg, tobolsk.jpg).
Pyramid Alignment
For larger .tif images, the naive approach became too slow. I implemented an image pyramid:
- Recursively downsample the image by a factor of 2 until it is small enough.
- Align at the smallest resolution using the naive method.
- Scale the displacement estimate back up and refine locally (using a smaller
refine_window) at each higher level.
Preprocessing (Edge Maps)
While pyramid + NCC worked well for almost all images, emir.tif was problematic due to its brightly colored blue robe. The robe is very bright in the blue channel but appears much darker in red, misleading intensity-based metrics.
To address this, I implemented a simple edge detector using gradient magnitude (finite differences in x and y). Aligning on edges rather than raw intensities improved alignment, since structural features (e.g., robe outline) are consistent across channels even if brightness is not. Note this preprocessing step worked for all images except icon.tif. This could be due to the many tiny edges/details in the image.
Problems
Without cropping, the algorithm often misaligned due to black/white borders and wrap-around effects. I incorporated a 20% border crop to avoid these artifacts and only use the center of the image for alignment.
For emir.tif, I needed edge-based preprocessing to handle the strong color differences. To combat this, I implemented a preprocessing step of finding gradient magnitude to produce a "edge detector" map of the image.
Initially, alignment took several minutes for .tif images. Moving the cropping outside inner loops and using refine_window at higher resolutions reduced runtime to under a minute.
cathedral.jpg
G aligned to B: (-5, -2)
R aligned to B: (-12, -3)
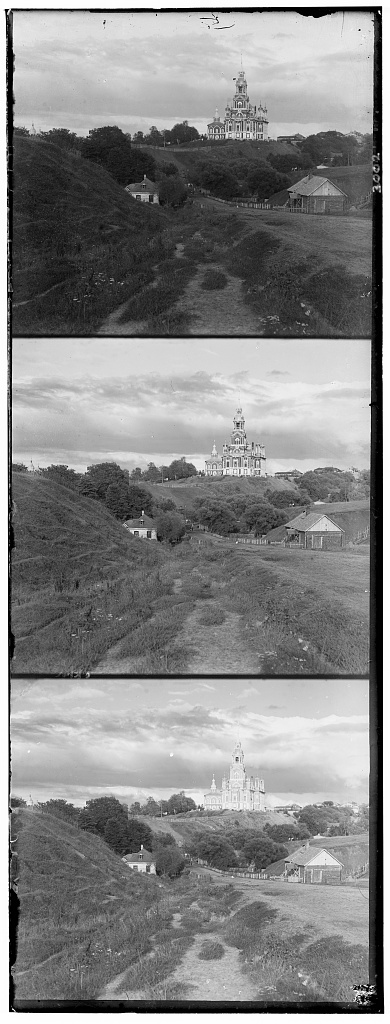
Before
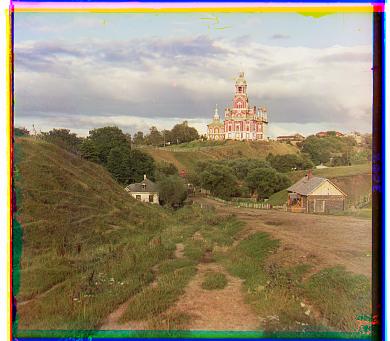
After
monastery.jpg
G aligned to B: (3, -2)
R aligned to B: (-3, -2)
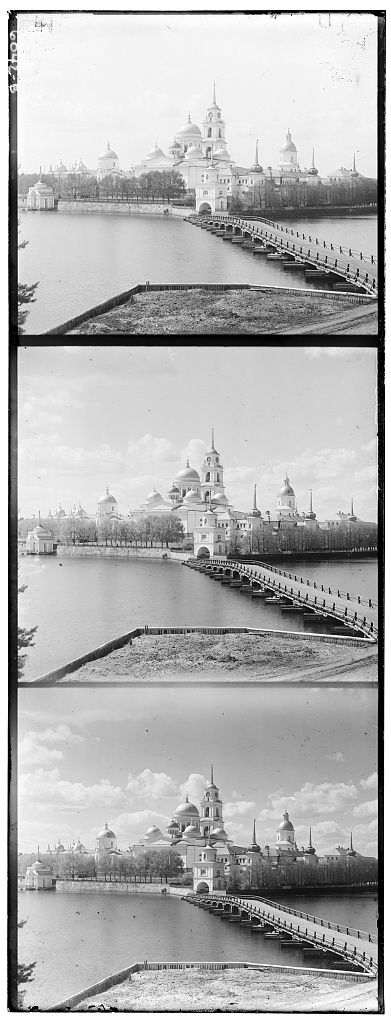
Before
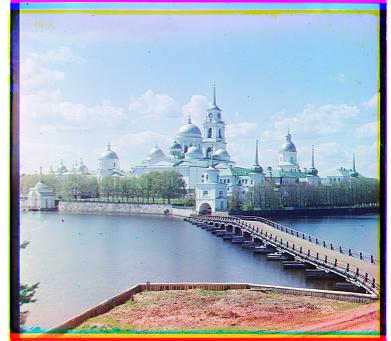
After
tobolsk.jpg
G aligned to B: (-3, -3)
R aligned to B: (-7, -3)
Before
After
church.tif
G aligned to B: (-25, -4)
R aligned to B: (-58, 4)
Before
After
harvesters.tif
G aligned to B: (-60, -18)
R aligned to B: (-124, -13)
Before
After
icon.tif
G aligned to B: (-41, -17)
R aligned to B: (-90, -23)
Before
After
italil.tif
G aligned to B: (-38, -22)
R aligned to B: (-77, -36)

Before
After
lastochikino.tif
G aligned to B: (3, 1)
R aligned to B: (-75, 8)
Before
After
lugano.tif
G aligned to B: (-41, 17)
R aligned to B: (-92, 29)
Before
After
melons.tif
G aligned to B: (-80, -10)
R aligned to B: (-177, -13)

Before
After
self_portrait.tif
G aligned to B: (-78, -29)
R aligned to B: (-175, -37)
Before
After
siren.tif
G aligned to B: (-49, 6)
R aligned to B: (-96, 24)
Before
After
three_generations.tif
G aligned to B: (-53, -13)
R aligned to B: (-111, -9)
Before
After
emir.tif
G aligned to B: (-49, -24)
R aligned to B: (-107, -40)
Before
After
capri.tif
G aligned to B: (-28, 17)
R aligned to B: (-65, 34)
Before
After
milan.tif
G aligned to B: (-57, -13)
R aligned to B: (-125, -24)
Before
After
painting.tif
G aligned to B: (-30, -1)
R aligned to B: (-70, -6)
Before
After